There's a unique joy in bringing a character to life on paper, especially when it's as charming and iconic as an owl. From their wide, knowing eyes to their fluffy feathers, cartoon owls offer an endless canvas for creativity. If you’ve ever wanted to capture that whimsical wisdom, you’re in the right place. This comprehensive guide will walk you through the delightful process of Drawing Cartoon Owls: Step-by-Step Guides, transforming complex shapes into simple, engaging characters you'll love.
Whether you're picking up a pencil for the first time or looking to refine your cartooning skills, we'll demystify the process, turning intimidating blank pages into opportunities for feathered fun.
At a Glance: Your Cartoon Owl Blueprint
- Start Simple: Begin with basic geometric shapes (circles, ovals, triangles) to build your owl's framework.
- Light Touch First: Always sketch lightly with a pencil so you can easily erase and refine your lines.
- Eyes are Key: Cartoon owls are known for their expressive, large eyes – make them a focal point.
- Feathered Friends: Use overlapping curved lines to suggest soft, fluffy feathers without drawing every single one.
- Personalize It: Once you've got the basics, experiment with different poses, expressions, and accessories to make your owl unique.
- Practice Makes Perfect: Don't be afraid to try again! Each attempt builds your skill and confidence.
The Enduring Appeal of the Cartoon Owl: Why We Love Them
Owls hold a special place in our imaginations. They’re creatures of the night, often associated with mystery and, thanks to ancient Greek mythology linking them to Athena, the goddess of wisdom, they've become enduring symbols of knowledge. Think "wise old owls" presiding over graduations or guiding characters in beloved stories. This rich cultural backdrop, combined with their naturally distinctive features—those large, captivating eyes, their silent flight, and unique calls—makes them perfect subjects for cartooning.
From Disney's iconic Owl in Winnie the Pooh to the epic "Legend of the Guardians: The Owls of Ga'Hoole," these nocturnal birds have soared through literature and animation, proving their timeless appeal. Their natural characteristics, like being predominantly brown or gray (though snowy owls are strikingly white!), provide a fantastic base for diverse cartoon interpretations. For us artists, their unique anatomy translates beautifully into simplified, expressive shapes.
Your Essential Toolkit for Bringing Owls to Life
Before we dive into the feathers and talons, let's gather your trusty art supplies. You don't need anything fancy to get started, just the basics:
- Pencils: A standard graphite pencil (HB or 2B is great for sketching) is all you need.
- Eraser: A good quality eraser is your best friend for making adjustments and cleaning up guide lines.
- Paper: Any drawing paper will do! Sketchbook, printer paper, or a dedicated drawing pad.
- Optional - Inking Pen: Once your pencil sketch is perfect, a fine-tip black pen or marker can help you finalize your outlines.
- Optional - Coloring Supplies: Crayons, colored pencils, markers, or even watercolors can add personality to your finished owl.
The Golden Rule of Cartooning: Sketch Light, Refine Later
One of the most valuable lessons in drawing, especially for beginners, is to start with a light hand. Use your pencil gently, laying down faint lines that are easy to erase. This allows you to experiment with shapes and proportions without fear of making permanent mistakes. Once you're happy with the basic structure, you can gradually press harder to darken your chosen lines, and then erase any unnecessary guides.
Another powerful technique, often employed by seasoned artists, is to outline the larger, more important shapes first, then proceed to the smaller details. This gives your drawing a strong foundation and ensures everything fits together proportionally before you get lost in the intricate bits.
Now, let's bring some owls to life!
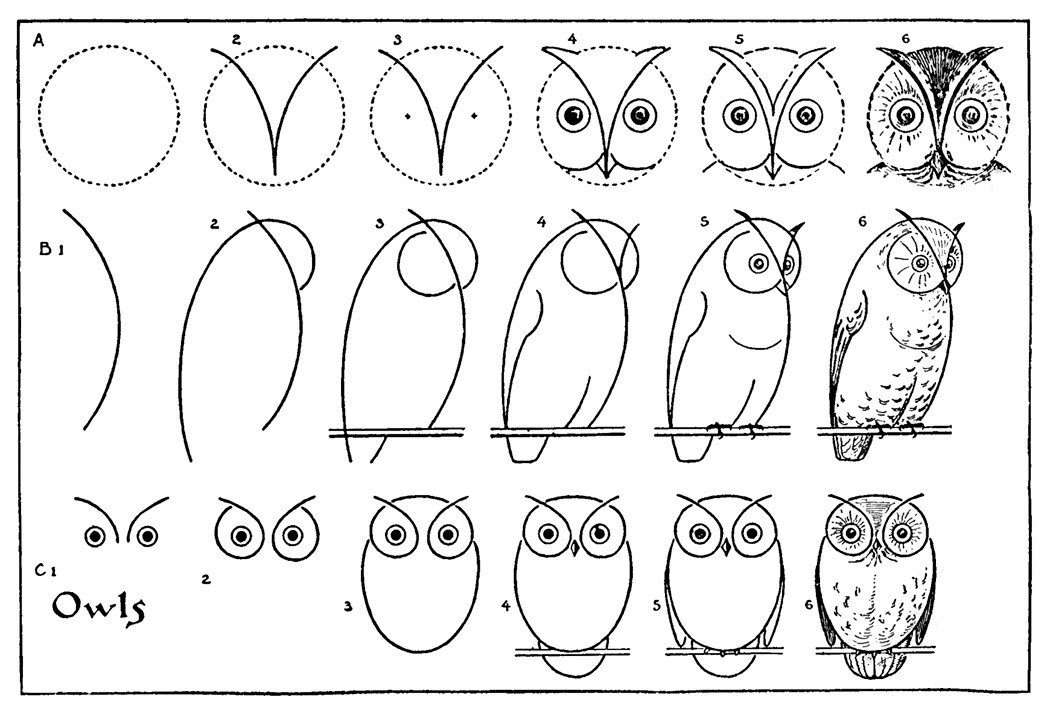
Guide 1: Drawing a Simple Perched Cartoon Owl (The Classic Look)
This guide focuses on a friendly, classic cartoon owl, perfect for beginners, perched comfortably on a branch. We'll build it up step-by-step, just like assembling a fun puzzle.
Step-by-Step Instructions: The Classic Perched Owl
1. Start with the Scene: Branch and Trunk
Every good owl needs a cozy spot to sit. Begin by drawing a vertical line on your paper—this will be the start of your tree trunk. Next, outline a branch with two parallel horizontal lines extending from the trunk. Connect them with a simple "V" shape to suggest where smaller twigs might sprout. Don't worry about perfection; this is just the foundation.
2. Building Out the Tree Trunk
Add some character to your tree trunk by drawing curved, ripple-like wrinkles around the base of where the branch meets the trunk. Then, extend the main trunk line downward, giving your tree more presence.
3. Shaping the Owl's Body
Now for our star! Sketch the owl's body, which will be nearly circular. Use gentle, curved, overlapping lines, especially near the top, to hint at soft feathers. This initial shape doesn't need to be a perfect circle; a slightly egg-like or potato shape often looks more natural for a cartoon. Later, we'll refine this outline with more detail.
4. Adding the Wings
Inside the main body outline you just drew, sketch the owl's wings. Use more overlapping curved lines to suggest layers of feathers. Think of a gentle "U" or "C" shape on each side, starting from the upper body and tapering slightly downwards.
5. Crafting the Tail and Defining the Head
Beneath the branch, sketch the owl's tail. Use a series of "U" shaped lines that protrude slightly, giving the impression of distinct tail feathers. Next, let's give our owl a head. Above the body, use curved lines to form a slightly flattened, curved quadrilateral shape – almost like a rounded-off square or trapezoid for the general head outline.
6. Bringing the Face to Life: Eyes, Beak, and Expressions
This is where your owl really starts to gain personality!
- Cheeks: Draw curved lines on either side of the lower part of the head shape to define the cheeks, adding softness.
- Eyes: Above each cheek, draw a partial circle for the main eye outline. Inside each of these, draw two successively smaller circles. The smallest, innermost circle is the pupil. Shade the area between the two smaller circles to make the pupils stand out, leaving the innermost circle white for a highlight if you like. This layering gives the eyes depth.
- Eyebrows: Add a curved line just above each eye to suggest an eyebrow. These can be adjusted later to convey different emotions.
- Beak: In the center of the face, between the eyes and above the cheeks, draw a simple diamond shape for the beak. Keep it small and stylized.
7. Finishing Touches: Feet and Feather Texture
- Feet: Carefully draw the owl's feet gripping the branch. Use several overlapping rounded shapes for each foot, suggesting toes and claws. You may need to erase some of your initial branch lines to make the feet look like they're truly wrapped around it.
- Feather Texture: To give your owl a truly feathered look, go back to the wings and body. Use many small "U" shaped lines in varying sizes and directions. These don't need to be perfect; a slight irregularity makes them look more natural and fluffy.
8. Coloring Your Classic Owl
Now for the fun part! Based on our ground rules, most owls are brown or gray. So, consider using shades of brown or gray for the main body and wings. If you're feeling adventurous and want a starker look, try solid white for a snowy owl! Experiment with lighter shades for the belly or face to add dimension.
Guide 2: Drawing a Cartoon Horned Owl (Adding a Touch of Character)
For those looking to add a bit more flair and specific character, let's tackle the distinctive cartoon horned owl. Remember, those "horns" are actually tufts of feathers, adding to their unique charm! This guide also follows a nine-step process, focusing on a slightly different silhouette.
Step-by-Step Instructions: The Horned Owl
1. The Distinctive Head and "Horns"
Begin by drawing the lower part of the head. It should be rounded on the sides with a gentle upward curve at the bottom/middle. Now for the signature feature: add the "horns" (feather tufts) at the top of the head using two prominent, bump-like curves. Between these horns, draw a smaller, subtle bump-like curve to complete the top of the head shape.
2. Crafting the Wings and Feet
- Wings: Draw the wings extending from the sides of the head. Make them wider at the top and gradually narrow downwards, with a slight, graceful curve.
- Feet: Add three-toed feet between the wings, near their bottom. Ensure the middle toe is slightly larger than the outer two, giving them a more realistic (but still cartoonish) grip.
3. Defining the Body and Beak
- Body: Draw the curve of the lower body. You can do this in segments between the wings and feet, or as one continuous, flowing line, erasing any overlaps with your existing wing/foot lines. This creates the main torso of your owl.
- Beak: In the middle of the head, draw a small vertical oval. Then, outline its pointy upper part, ensuring the tip of the beak touches the bottom of this oval. Finally, draw a subtle curved line extending from each horn towards the upper part of the beak, giving it more definition.
4. Expressive Eyes and Optional Feather Detail
- Eyes: Horned owls are known for their intense gaze. Draw a pair of large, round circles for the eye outlines. Inside each, add a small oval shape to represent a highlight (this will be left white). Then, draw a smaller circle for the pupil, making sure it's partially overlapped by the highlight.
- Feathers (Optional Detail): To add depth to your wings, you can draw two sets of three gentle curves around the vertical middle of each wing. Then, from between these curves, draw a pair of lines extending down to the wing tip. If you prefer a simpler, bolder look, you can absolutely omit these feather details.
5. Inking and Coloring Your Horned Friend
- Finish Line Drawing: This is where your drawing truly comes to life! Carefully outline areas on the head (a smaller, inner shape) and the chest/stomach (an oval-like shape with a zigzag top to hint at feathers) that will have different colored feathers. These will serve as guides for your coloring. Now, with a black pen or marker, trace over all the pencil lines you want to keep, or simply darken your pencil lines if you're not inking. Fill the pupils with solid black or dark shading, making sure to leave those small highlights white for a sparkling effect.
- Coloring: For a classic horned owl, use brown for the main body. Lighter brown works wonderfully for those outlined accent areas and the wing feather strips (if you added them). The beak and feet are often a vibrant orange, while the eyes are a bright yellow. Alternatively, you could use shades of gray for the main body and light gray for the accents, creating a different mood.
Beyond the Basics: Personalizing Your Cartoon Owls
You've mastered the foundational steps for Drawing Cartoon Owls: Step-by-Step Guides. But the real magic happens when you start making them your own!
- Vary Poses: Don't just stick to a perched owl. Try drawing your owl mid-flight, stretching, or looking inquisitively to the side. Simple changes in head or body tilt can dramatically alter the pose.
- Play with Expressions: Those large eyes are perfect for conveying emotion. Change the shape of the eyebrows (more angled for anger, softer curves for sadness), add a subtle smile, or adjust the pupil size.
- Accessorize: Give your owl a tiny monocle, a wizard hat, a little satchel, or even a tiny teacup. Accessories can tell a story and add heaps of personality.
- Backgrounds: Place your owl in different settings – a snowy forest, a bustling city street, or nestled among autumn leaves.
- Different Breeds: While our guides covered a general and a horned owl, you can adapt the shapes to reflect other owl types. Think about a snowy owl's rounder head and less prominent ear tufts, or a barn owl's distinctive heart-shaped face.
- Simplify or Detail: Some cartoon styles are incredibly simplistic, using just a few lines to convey the essence. Others might add more intricate feather patterns or background elements. Experiment with what feels right for your aesthetic.
Remember, every artist starts with basic shapes. Your unique style will emerge through practice and experimentation. Don't be afraid to deviate from the guide once you feel comfortable. The goal is to have fun and express yourself! If you're looking for more inspiration and to see the incredible variety of ways owls can be cartooned, feel free to Explore our owl cartoon gallery. Seeing different interpretations can spark new ideas for your own creations.
Common Questions About Drawing Cartoon Owls
It's natural to have questions as you embark on your artistic journey. Here are answers to some common queries beginners often have:
What's the best way for a beginner to start drawing cartoon owls?
The absolute best way is to start with a pencil, use light lines, and focus on basic shapes first. Don't try to draw a perfect owl right away. Begin with a large circle for the body, then add a smaller circle or oval for the head. Build up your character from these simple geometric forms, then refine them into the specific owl features. Our "Simple Perched Cartoon Owl" guide is designed precisely for this approach.
How do I make my owl look "wise" or "cute"?
The eyes are your most powerful tool! For a "wise" owl, draw larger eyes with distinct, slightly lowered or V-shaped eyebrows to give a thoughtful or serious gaze. A slightly larger, more prominent beak can also add to the wise appearance. For a "cute" owl, make the eyes even bigger and rounder, with high, arched eyebrows and often larger, circular pupils. Adding rosy cheeks or a slight smile can enhance the cuteness. The overall body shape can also contribute: a plump, rounded body tends to look cuter.
Can I draw different types of cartoon owls using these guides?
Absolutely! These guides provide a fantastic foundation. For example, to draw a snowy owl, you would primarily use the "Simple Perched Cartoon Owl" guide but adapt the head to be rounder with less prominent ear tufts (as snowy owls don't have distinct "horns"). Then, simply color it white with subtle gray markings. For a barn owl, you'd focus on shaping the face into its distinctive heart-like outline around the eyes, while keeping the body and wing structure similar to our basic guides. The key is to understand the general anatomy and then tweak specific features to match the owl species you desire.
What if my drawing doesn't look like the examples?
That's perfectly normal, especially when you're starting out! Every artist's hand is unique, and your interpretation will naturally differ. The goal isn't to create an exact replica but to understand the process and develop your own style. Don't get discouraged. Keep practicing, focus on one step at a time, and remember that "mistakes" are just opportunities to learn and refine your technique. The more you draw, the better your hand-eye coordination will become, and the more confident you'll feel.
Your Next Artistic Adventure: Keep Drawing, Keep Exploring!
You've now explored the essential steps for Drawing Cartoon Owls: Step-by-Step Guides, from the classic perched buddy to the distinguished horned variety. You've armed yourself with the right tools, the best techniques, and a newfound understanding of what makes these characters so captivating.
Drawing is a skill that grows with practice, patience, and a healthy dose of playfulness. Don't be afraid to fill pages with your feathered friends, experimenting with their expressions, adding quirky props, or placing them in imaginative settings. Each line you draw, each color you choose, is a step further on your creative path.
So grab your pencil, find a comfortable spot, and let your imagination take flight. The world of cartoon owls is vast and wonderful, just waiting for your unique touch. Happy drawing!